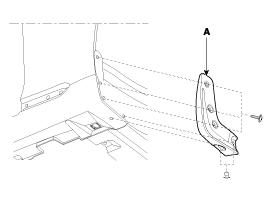
Hyundai Genesis: Body Side Molding / Front Mud Guard Repair procedures
Hyundai Genesis (DH) 2013-2016 Service Manual / Body (Interior and Exterior) / Body Side Molding / Front Mud Guard Repair procedures
| Replacement |
|
| 1. |
After loosening the mounting screw, remove the front mud guard (A) by using a screw driver.
|
| 2. |
Install in the reverse order of removal.
|
 A Pillar Garnish Repair procedures
Replacement
•
Put on gloves to prevent hand injuries.
•
When removing with a flat-tip screwdriver or remover, wrap protective tape around ...
 Rear Mud Guard Repair procedures
Replacement
•
When removing with a flat-tip screwdriver or remover, wrap protective tape around the tools to prevent damage to components.
•
Take care not to scra ...
Other information:
Hyundai Genesis (DH) 2013-2016 Owners Manual: Emergency trunk safety release
Your vehicle is equipped with an Emergency Trunk Safety Release lever located inside the trunk. When someone is inadvertently locked in the trunk, the trunk can be opened by moving the lever in the direction of the arrow and pushing the trunk open. WARNING You and your passengers ...
Hyundai Genesis (DH) 2013-2016 Service Manual: Repair procedures
Adjustment 1. After loosening the hinge (A) mounting bolt, adjust the hood (B) by moving it up and down or from side to side and tighten the bolt. 2. Adjust the hood height by moving the hood overslam bumpers (C) up and down. 3. After loosening the hood latch (D) mounting bolts, adjust ...
© 2013-2025 www.hgenesisdh.com


