Hyundai Genesis: Body Side Molding / A Pillar Garnish Repair procedures
Hyundai Genesis (DH) 2013-2016 Service Manual / Body (Interior and Exterior) / Body Side Molding / A Pillar Garnish Repair procedures
| Replacement |
|

|

| 1. |
Using a screwdriver, remove the A pillar garnish (A).
[General type]
[Panorama sunroof type]
|


 : After removing the front of roof side molding, remove the A pillar garnish.
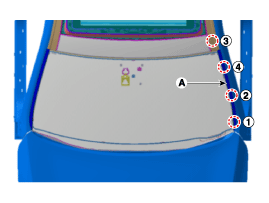
| 2. |
Install in the reverse order of removal.
|
 Rear Wheel Guard Repair procedures
Replacement
•
Put on gloves to prevent hand injuries.
•
When removing with a flat-tip screwdriver or remover, wrap protective tape around ...
 Front Mud Guard Repair procedures
Replacement
•
When removing with a flat-tip screwdriver or remover, wrap protective tape around the tools to prevent damage to components.
•
Take care not to scra ...
Other information:
Hyundai Genesis (DH) 2013-2016 Service Manual: CVVT (Continuously Variable Valve Timing) System Description and Operation
Description Continuous Variable Valve Timing (CVVT) system advances or retards the valve timing of the intake and exhaust valve in accordance with the ECM control signal which is calculated by the engine speed and load. By controlling CVVT, the valve over-lap or under-lap occurs, which m ...
Hyundai Genesis (DH) 2013-2016 Service Manual: Relay Box (Engine Compartment) Repair procedures
Inspection 1. Disconnect the negative (-) battery terminal. 2. Pull out the relay from the engine compartment relay box. Power Relay (Type A) Check for continuity between the terminals. A : start relay 1. After supplying power to between No. 85 and 86 power relay terminals, check t ...
© 2013-2025 www.hgenesisdh.com
