Hyundai Genesis: Panorama Sunroof / Panorama Sunroof Assembly Repair procedures
Hyundai Genesis (DH) 2013-2016 Service Manual / Body (Interior and Exterior) / Panorama Sunroof / Panorama Sunroof Assembly Repair procedures
| Removal |
|
| 1. |
Remove the roof side molding.
(Refer to Body Side Molding - "Roof Side Molding") |
| 2. |
Remove the front glass.
(Refer to Panorama Sunroof - "Front Glass") |
| 3. |
Remove the roof trim assembly.
(Refer to Roof Trim - "Roof Trim Assembly") |
| 4. |
Remove the curtain airbag (CAB) module.
(Refer to Restraint - "Curtain Airbag (CAB) Module") |
| 5. |
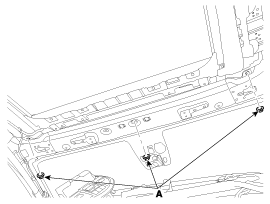
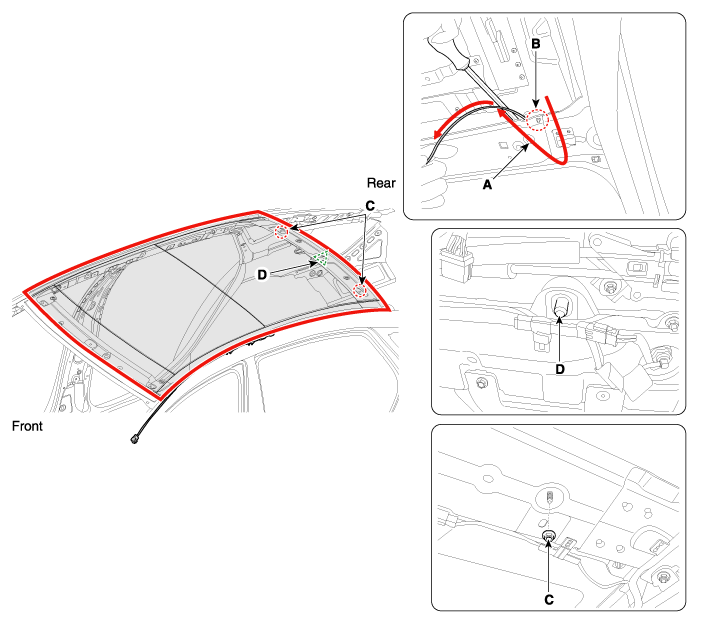
Loosen the panorama sunroof mounting nuts (A).
[Front]
[Rear]
|
| 6. |
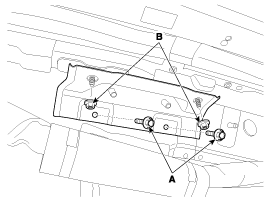
Loosen the bolts (A) and nuts (B) on the side of the panorama sunroof.
|
| 7. |
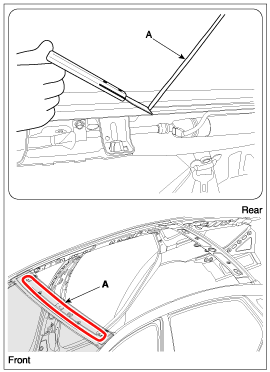
Pull the square wire (A) from side to side, then apply a
force in the direction of the arrow to cut off the residual sealant on
front edge (B).
|
| 8. |
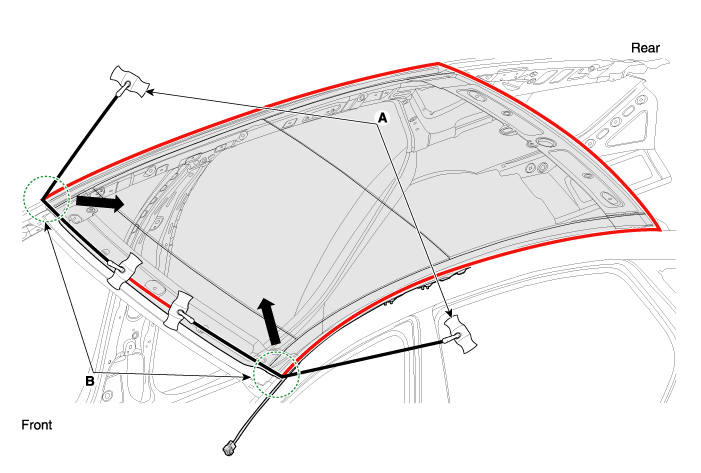
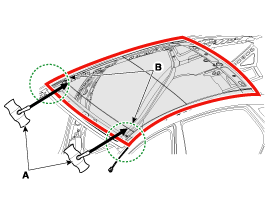
Push wire (A) from the outside of the body toward the face of edge (B) in the direction of the arrow.
|
| 9. |
When wire lead is visible inside body, pull the wire lead (A) in the direction of arrow.
|
| 10. |
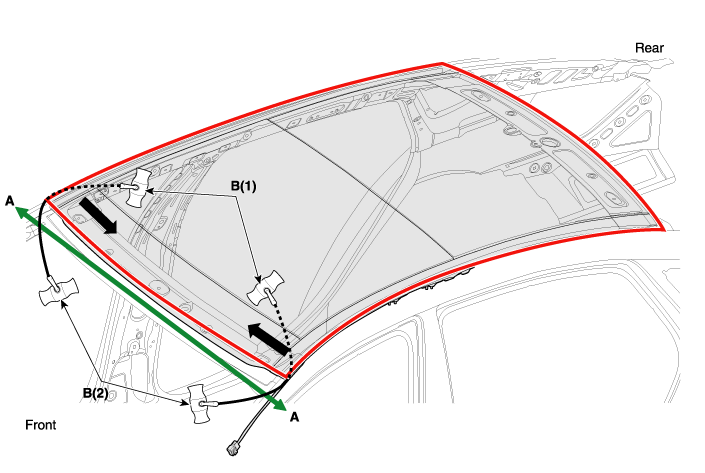
Pull the square wire (B) from side to side, then apply a
force in the direction of the arrow to cut off the residual sealant on
front section (A-A).
|
| 11. |
Pull the square wire (B) from side to side, then apply a
force in the direction of the arrow to cut off the residual sealant on
side section (A-A).
|
| 12. |
Pull the square wire (B) from side to side, then apply a
force in the direction of the arrow to cut off the residual sealant on
rear section (A-A).
|
| 13. |
Cut residual sealant on every surface, and then remove panorama sunroof assembly (A).
|
| Installation |
|
| 1. |
Use a blade to cut off residual sealant (A) around body panel.
|
| 2. |
If panorama sunroof assembly (A) is reused, use a blade to remove residual sealant (B) around the body panel.
|
| 3. |
Use alcohol or an air gun to clean up the edges of the body panel and the panorama sunroof. |
| 4. |
Use a sealant gun to apply sealant (B) around body panel (A).
|
| 5. |
Align with centering device hole (A) of the body, and carefully mount the panorama sunroof on the body panel.
[Front]
[Rear]
|
| 6. |
Align the panorama sunroof and frame before fully mounting the panorama sunroof assembly (A). |
| 7. |
Apply tape to around the panorama sunroof assembly to prevent the assembly from coming off.
|
| 8. |
Tighten panorama sunroof mounting nuts (A).
[Front]
[Rear]
|
| 9. |
Tighten panorama sunroof side mounting bolts (A) and nuts (B).
|
| 10. |
Install the curtain airbag (CAB) module.
(Refer to Restraint - "Curtain Airbag (CAB) Module") |
| 11. |
To make sure that the applied sealant is completely hardened,
leave the car on a flat surface for at least 4 hours after installing
the panorama sunroof.
|
| 12. |
Conduct a leak testing.
|
| 13. |
In case of water leaks, apply sealant to the water-leaking area. |
| 14. |
Install the roof trim assembly. |
| 15. |
Install the roof side molding. |
| 16. |
Install the front glass. |
 Roller Blind Repair procedures
Removal
1.
Open the roller blind by pushing the panorama sunroof switch.
•
Leave 10 ~ 20cm (0.3937 ~ 0.7874 in) of the roller blind unopened.
2.
Remove the roo ...
 Mirror
...
Other information:
Hyundai Genesis (DH) 2013-2016 Service Manual: Rear Wheel House Trim Repair procedures
Replacement • Put on gloves to prevent hand injuries. • When removing with a flat-tip screwdriver or remover, wrap protective tape around the tools to prevent damage to components. • When removing the interior trim pieces, use a p ...
Hyundai Genesis (DH) 2013-2016 Service Manual: CO2 Sensor Description and Operation
Description This system maintains the density of carbon dioxide constantly in vehicle interior by measuring the amount of carbon dioxide to increase the comfortableness and the fuel consumption rate when air conditioning system is operating. 1. CO2 sensor signal2. Ground3. IG2(12V) ...
© 2013-2025 www.hgenesisdh.com


 Square wire
  Insert-type wire grip








 Sealant gun