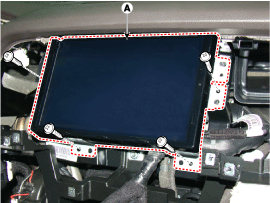
Hyundai Genesis: Premium AVN System / Front LCD monitor Repair procedures
Hyundai Genesis (DH) 2013-2016 Service Manual / Body Electrical System / Premium AVN System / Front LCD monitor Repair procedures
| Removal |
Take care not to scratch the crash pad and related parts. |
| 1. |
Disconnect the negative (-) battery terminal. |
| 2. |
Remove the crash pad side garnish assembly.
(Refer to Body - "Crash pad side garnish assembly")
|
| 3. |
Remove the fascia panel monitor.
(Refer to Body - "Crash Pad Main Lower Assembly") |
| 4. |
Remove the front LCD monitor after loosening the mounting screws.
|
| Installation |
| 1. |
Install the front LCD monitor after connecting the connector. |
| 2. |
Install the monitor fascia panel.
|
 Front LCD monitor Components and Components Location
Components
...
 External AMP Components and Components Location
Components
NO.Connector ANO.Connector BNO.Connector C1-1GND1transmission (Tx)2Front center (-)2Front Left midrange/tweeter(+)2reception (Rx)3Front center (+)3Front Left midrange/tweeter(-)3? ...
Other information:
Hyundai Genesis (DH) 2013-2016 Service Manual: Crash Pad Lower Panel Components and Components Location
Component Location 1. Crash pad lower panel ...
Hyundai Genesis (DH) 2013-2016 Service Manual: Smart Cruise Control Switch Components and Components Location
Components 1. SET - switch2. RES + switch3. SCC switch4. CANCEL switch5. CRUISE switch ...
© 2013-2025 www.hgenesisdh.com


