Hyundai Genesis: Front Door / Front Door Trim Repair procedures
Hyundai Genesis (DH) 2013-2016 Service Manual / Body (Interior and Exterior) / Front Door / Front Door Trim Repair procedures
| Replacement |
|
|
| 1. |
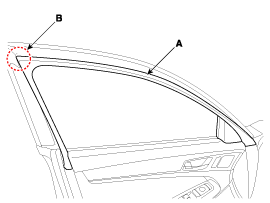
After loosening the mounting clips, remove the front door frame inner cover (A).
|
| 2. |
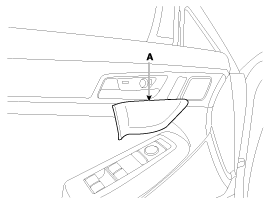
Using a flat-tip or remover, remove the front door pull handle cap (A).
|
| 3. |
Pull the front door inside handle using a flat head screwdriver and remove the cap (A) through the hole inside the handle.
|
| 4. |
After loosening the mounting screws, remove the lower part of the front door trim (A) using a flat-tip screwdriver.
|
| 5. |
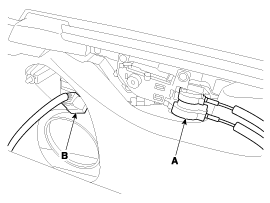
Remove the front door inside handle cage (A). |
| 6. |
Remove the front door extension connector (B).
|
| 7. |
Install in the reverse order of removal.
|
 Front Door Trim Components and Components Location
Component Location
1. Front door trim
...
 Front Door Inside Handle Repair procedures
Replacement
1.
Remove the front door trim.
(Refer to Front Door - "Front Door Trim")
2.
Disconnect the front door inside handle lamp connector (A).
3.
After loosening the mounting screws ...
Other information:
Hyundai Genesis (DH) 2013-2016 Service Manual: Rear Curtain Switch Repair procedures
Removal Crash pad lower panel switch 1. Disconnect the negative (-) battery terminal. 2. Remove the crash pad lower panel. (Refer to Body - "Crash Pad Lower Panel") 3. Remove the crash pad lower panel switch (A) after disengaging the mounting clip. Wear gloves to ...
Hyundai Genesis (DH) 2013-2016 Owners Manual: Manual heating and air conditioning
The heating and cooling system can be controlled manually by pushing buttons other than the AUTO button. In this case, the system works sequentially according to the order of buttons selected. When pressing any button except the AUTO button while using automatic operation, the function ...
© 2013-2025 www.hgenesisdh.com


