Hyundai Genesis: ECS(Electronic Control Suspension) System / ECS-G Sensor Repair procedures
Hyundai Genesis (DH) 2013-2016 Service Manual / Suspension System / ECS(Electronic Control Suspension) System / ECS-G Sensor Repair procedures
| Replacement |
Front
| 1. |
Loosen the wheel nuts slightly. Raise the vehicle, and make sure it is securely supported. |
| 2. |
Remove the front wheel and tire (A) from the front hub.
|


| 3. |
Remove the wheel guard. |
| 4. |
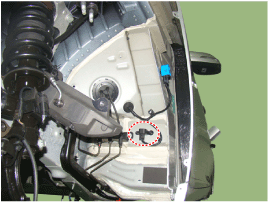
Loosen the bolt and then remove the G-Sensor.
[Right front]
[Left front]
|

Rear
| 1. |
Loosen the wheel nuts slightly. Raise the vehicle, and make sure it is securely supported. |
| 2. |
Remove the front wheel and tire (A) from the rear hub.
|
| 3. |
Remove the trunk luggage side trim [RH].
(Refer to Body - "Trunk Trim") |
| 4. |
Loosen the bolt and then remove the G-Sensor.
|

| Installation |
| 1. |
Installation in the reverse order of removal. |
| 2. |
Perform the ESC variant coding.
(Refer to ECS (Electronic Control Suspension) System - "ECS Control Unit") |
 ECS Control Unit Repair procedures
Replacement
1.
Disconnect the battery (-) terminal.
2.
Remove the trunk luggage side trim [RH].
(Refer to Body - "Trunk Trim")
3.
Disconnect the connector and then remove the ECS control ...

Other information:
Hyundai Genesis (DH) 2013-2016 Owners Manual: Trip computer
Overview Description The trip computer is a microcomputer- controlled driver information system that displays information related to driving. ✽ NOTICE Some driving information stored in the trip computer (for example Average Vehicle Speed) resets if the battery is disconnected. Tr ...
Hyundai Genesis (DH) 2013-2016 Service Manual: Damper Clutch Control Solenoid Valve Repair procedures
Inspection 1. Turn ignition switch OFF. 2. Disconnect the E Module connector. 3. Measure resistance between solenoid valve terminals. 4. Check that the resistance is within the specification. ...
© 2013-2025 www.hgenesisdh.com
