Hyundai Genesis: Ignition System / Spark Plug Repair procedures
Hyundai Genesis (DH) 2013-2016 Service Manual / Engine Electrical System / Ignition System / Spark Plug Repair procedures
| Inspection |
| [On vehicle inspection] |
| 1. |
Accelerate the engine to about 3,000 rpm for 3 minutes or longer. |
| 2. |
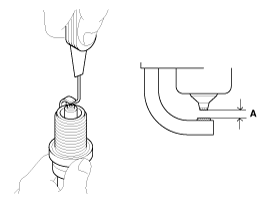
Remove the spark plug. |
| 3. |
Check the spark plug visually.
If the electrode is dry, the spark plug is normal.
If the electrode is wet, check the damage and electrode gap as below. |
| [Component Inspection] |
| 1. |
Check the spark plug for any damage on its thread and insulator.
If there is damage, replace the spark plug. |
| 2. |
Check the electrode. Measure the insulation resistance with an ohmmeter.
If the resistance is less than the specified value, adjust the electrode gap.
|

| 3. |
Check the spark plug electrode gap.
If the gap is greater than the maximum, replace the spark plug.
|

| Cleaning |
The combustion temporarily becomes unstable, due to the aged
fuel and the carbon deposits accumulated on the spark plug(s) after
long-term storage.
| [1st Method] |
| 1. |
Start the engine and keep the engine running at idle for 2 minutes. |
| 2. |
Step on the accelerator pedal and hold it steady at 4500 rpm
with the shift lever in N position to warm up the engine until the
temperature of the engine coolant reaches 80°C. |
| 3. |
Keep the engine running at 2500~3000 rpm in the N position for 15 minutes.
|

| [2nd Method] |
|
| 1. |
Start the engine and keep the engine running at idle for 2 minutes. |
| 2. |
Drive the vehicle for over 20 minutes, keeping the engine speed above 3500 rpm.
|

| Removal |
| 1. |
Remove the ignition coil.
(Refer to Ignition System - "Ignition Coil") |
| 2. |
Using a spark plug wrench, remove the spark plug (A).
[Bank 1]
[Bank 2]
|


| Installation |
| 1. |
Install in the reverse order of removal.
|
 Spark Plug Specifications
Specification
ItemSpecificationTypeDILKR7A11Gap 1.0 ~ 1.1 mm (0.0394 ~ 0.0433 in.)
...
 Charging System
...
Other information:
Hyundai Genesis (DH) 2013-2016 Owners Manual: Front seats
WARNING Take the following precautions when adjusting your seat: NEVER attempt to adjust the seat while the vehicle is moving. The seat could respond with unexpected movement and may cause loss of vehicle control resulting in an accident. Do not place anything under the fr ...
Hyundai Genesis (DH) 2013-2016 Owners Manual: Air bag collision sensors
WARNING To reduce the risk of an air bag deploying unexpectedly and causing serious injury or death: Do not hit or allow any objects to impact the locations where air bags or sensors are installed. Do not perform maintenance on or around the air bag sensors. If the location ...
© 2013-2025 www.hgenesisdh.com
