Hyundai Genesis: Fender / Repair procedures
Hyundai Genesis (DH) 2013-2016 Service Manual / Body (Interior and Exterior) / Fender / Repair procedures
| Replacement |
|

|

| 1. |
Remove the front bumper.
(Refer to Front Bumper - "Front Bumper Cover") |
| 2. |
Loosen the front wheel guard mounting screws and pin-type retainers.
|

| 3. |
Loosen the mounting screws and pin-type retainers and remove the side sill garnish. |
| 4. |
Remove the side sill molding.
(Refer to Body Side Molding - "Side Sill Molding") |
| 5. |
Remove the front bumper side mounting bracket (A) after loosening the screw and bolt.
|

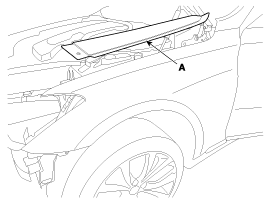
| 6. |
Remove the fender side cover (A).
|
| 7. |
Remove the fender assembly (A) after loosening the nut and bolts.
|

| 8. |
Install in the reverse order of removal.
|
 Components and Components Location
Component Location
1. Fender assembly
...
 Hood
Hood
...
Other information:
Hyundai Genesis (DH) 2013-2016 Service Manual: Description and Operation
Description Integrated Rain Sensor Integrated rain sensor (A) controls three systems: front wiper, auto-light, and central air conditioner. 1. Wiper Control System When "AUTO" switch signal is received from the multi-function switch on the right, the integrated rain sensor detects the amo ...
Hyundai Genesis (DH) 2013-2016 Service Manual: Auto Head Lamp Leveling Unit Repair procedures
Inspection 1. Ignition "ON". 2. Turn on the head lamp switch. 3. Check that the aim of the head lamp changes smoothly when the head lamp leveling device switch is turned on. 4. If it does not operate well, check the connector and terminals to make sure that they are connected. If t ...
© 2013-2025 www.hgenesisdh.com
