Hyundai Genesis: Engine Control System / Manifold Absolute Pressure Sensor (MAPS) Repair procedures
Hyundai Genesis (DH) 2013-2016 Service Manual / Engine Control / Fuel System / Engine Control System / Manifold Absolute Pressure Sensor (MAPS) Repair procedures
| Inspection |
| 1. |
Connect the GDS on the Data Link Connector (DLC). |
| 2. |
Measure the output voltage of the MAPS at idle and with ignition ON.
|
| Removal |
| 1. |
Turn the ignition switch OFF and disconnect the battery negative (-) cable. |
| 2. |
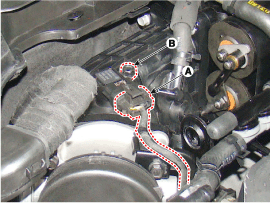
Disconnect the manifold absolute pressure sensor connector (A). |
| 3. |
Remove the installation bolts (B), and then vertically remove the sensor from the surge tank.
|
| Installation |
|
|
| 1. |
To install, reverse the removal procedure.
|
 Manifold Absolute Pressure Sensor (MAPS) Schematic Diagrams
Circuit Diagram
...
 Engine Coolant Temperature Sensor (ECTS) Description and Operation
Description
Engine Coolant Temperature Sensor (ECTS) is located in the
engine coolant passage of the cylinder head for detecting the engine
coolant temperature. The ECTS uses a thermistor whose ...
Other information:
Hyundai Genesis (DH) 2013-2016 Owners Manual: Special driving conditions
Hazardous driving conditions When hazardous driving conditions are encountered such as water, snow, ice, mud or sand: Drive cautiously and allow extra distance for braking. Avoid sudden movements in braking or steering. If stuck in snow, mud, or sand, use second gear. Accelerate slowly ...
Hyundai Genesis (DH) 2013-2016 Service Manual: Repair procedures
Component Replacement after Deployment Before doing any SRS repairs, use the GDS to check for DTCs. Refer to the Diagnostic Trouble Code list for repairing of the related DTCs. When the front airbag(s) deployed after a collision, replace the following items. - SR ...
© 2013-2025 www.hgenesisdh.com


