Hyundai Genesis: Front Axle Assembly / Front Hub / Knuckle / Tone Wheel Repair procedures
Hyundai Genesis (DH) 2013-2016 Service Manual / Driveshaft and axle / Front Axle Assembly / Front Hub / Knuckle / Tone Wheel Repair procedures
| Replacement |
[4WD]
| 1. |
Loosen the wheel nuts slightly. Raise the vehicle, and make sure it is securely supported. |
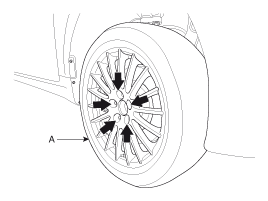
| 2. |
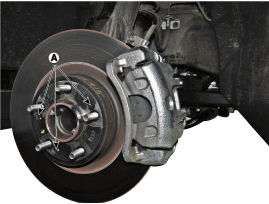
Remove the front wheel and tire (A) from the front hub
|

| 3. |
Remove the brake caliper assembly.
(Refer to Brake System - "Front Disc Brake") |
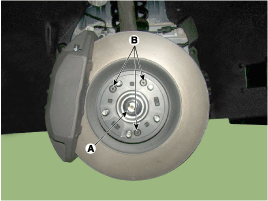
| 4. |
Loosen the driveshaft caulking nut (A) and then remove the brake disc by loosening the screw (B-3EA).
|

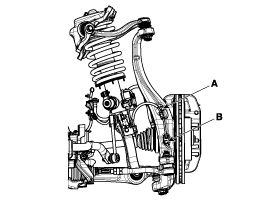
| 5. |
Remove the wheel speed sensor by loosening the wheel speed sensor bracket bolt (A) and wheel speed sensor mounting bolt (B).
|
| 6. |
Remove the tie rod end ball joint from the knuckle.
|

| 7. |
Using the special tool (09568-2J100), remove the compression arm from the knuckle.
|

| 8. |
Loosen the nut and using the special tool (09568-2J100), remove the lateral arm from the knuckle.
|
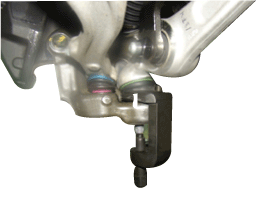
| 9. |
Using the special tool (09568-2J100), separate the upper arm from the knuckle and then remove the kuckle assembly.
|

| 10. |
Using a plastic hammer, disconnect driveshaft (A) from the axle hub (B).
|

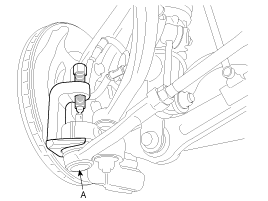
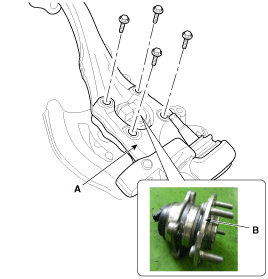
| 11. |
Loosen the hub mounting bolt and then remove the hub assembly (B) from the knuckle (A).
|

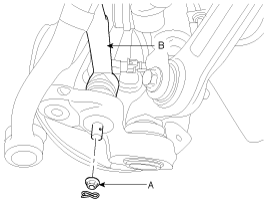
| 12. |
Loosen the bolt and then remove the dust cover (A).
|
| 13. |
Install in the reverse order of removal.
|
| 14. |
Check the front alignment.
(Refer to Suspension System - "Front Alignment") |
[2WD]
| 1. |
Loosen the wheel nuts slightly. Raise the vehicle, and make sure it is securely supported. |
| 2. |
Remove the front wheel and tire (A) from the front hub.
|
| 3. |
Remove the brake caliper assembly.
(Refer to Brake System - "Front Disc Brake") |
| 4. |
Remove the brake disc by loosening the screw (A).
|
| 5. |
Remove the wheel speed sensor by loosening the wheel speed sensor bracket bolt (A) and wheel speed sensor mounting bolt (B).
|

| 6. |
Remove the tie rod end ball joint from the knuckle.
|
| 7. |
Loosen the tension arm mount bolt (A), and then remove the tension arm (B).
|

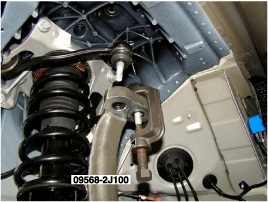
| 8. |
Using the special tool (09568-2J100), remove the lateral arm from the knuckle.
|

| 9. |
Using the special tool (09568-2J100), separate the upper arm from the knuckle and then remove the kuckle assembly.
|
| 10. |
Loosen the hub mounting bolt and then remove the hub assembly (B) from the knuckle (A).
|
| 11. |
Loosen the bolt and then remove the dust cover (A).
|
| 12. |
Install in the reverse order of removal.
|
| 13. |
Check the front alignment.
(Refer to Suspension System - "Front Alignment") |
| Inspection |
| 1. |
Check the hub for cracks and the splines for wear. |
| 2. |
Check the brake disc for scoring and damage. |
| 3. |
Check the knuckle for cracks. |
| 4. |
Check the bearing for cracks or damage. |
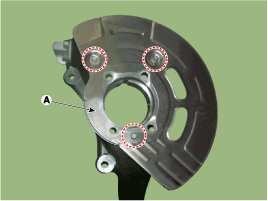
 Front Hub / Knuckle / Tone Wheel Components and Components Location
Components
1. Front knuckle assembly2. Dust cover3. Front hub bearing4. Brake disc
...

Other information:
Hyundai Genesis (DH) 2013-2016 Service Manual: Water Jacket Seperator Components and Components Location
Components 1. Water jacket separator 1#2. Water jacket separator 2#3. Cylinder block ...
Hyundai Genesis (DH) 2013-2016 Service Manual: 27 Brake Control Solenoid Valve Specifications
Specifications Direct control VFS[27/B] ? Control type : Normal low type Control Pressure kpa (kgf/cm?, psi)0~1569.06 (0~16,0~227.57)Current value(mA)0~1100 Internal resistance(?)5.0~5.6 ...
© 2013-2025 www.hgenesisdh.com
