Hyundai Genesis: Interior Trim / Door Scuff Trim Repair procedures
Hyundai Genesis (DH) 2013-2016 Service Manual / Body (Interior and Exterior) / Interior Trim / Door Scuff Trim Repair procedures
| Replacement |
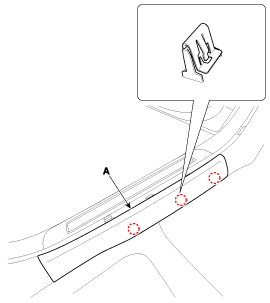
[Front Door Scuff Trim]
|
|
| 1. |
Using a screwdriver or remover, remove the front door scuff trim (A).
|
| 2. |
Install in the reverse order of removal.
|
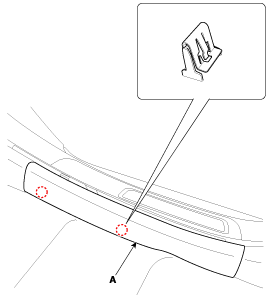
[Rear Door Scuff Trim]
|
|
| 1. |
Using a screwdriver or remover, remove the rear door scuff trim (A).
|
| 2. |
Install in the reverse order of removal.
|
 Door Scuff Trim Components and Components Location
Component Location
1. Front door scuff trim2. Rear door scuff trim
...
 Cowl Side Trim Components and Components Location
Component Location
1. Cowl side trim
...
Other information:
Hyundai Genesis (DH) 2013-2016 Service Manual: Steering Gear box Repair procedures
Replacement [LHD] 1. Loosen the wheel nuts slightly. Raise the vehicle, and make sure it is securely supported. 2. Remove the front wheel and tire (A) from the front hub. Be careful not to damage the hub bolts when removing the front wheel and tire. 3. Remove ...
Hyundai Genesis (DH) 2013-2016 Service Manual: Curtain Airbag (CAB) Module Description and Operation
Description Curtain airbags are installed inside the headliner (LH and RH) and protect the driver and passenger from danger when a side crash occurs. The SRSCM determines deployment of the curtain airbag by using the side impact sensor (SIS) signal. Never attempt to m ...
© 2013-2025 www.hgenesisdh.com


