Hyundai Genesis: Engine Control System / CVVT Oil Control Valve (OCV) Repair procedures
Hyundai Genesis (DH) 2013-2016 Service Manual / Engine Control / Fuel System / Engine Control System / CVVT Oil Control Valve (OCV) Repair procedures
| Inspection |
| 1. |
Turn the ignition switch OFF. |
| 2. |
Disconnect the OCV connector. |
| 3. |
Measure resistance between the OCV terminals 1 and 2. |
| 4. |
Check that the resistance is within the specification.
|
| Removal |
| [CVVT Oil Control Valve (Intake)] |
| 1. |
Turn the ignition switch OFF and disconnect the battery negative (-) cable. |
| 2. |
Remove the intake manifold.
(Refer to Engine Mechanical System - “Intake And Exhaust System”) |
| 3. |
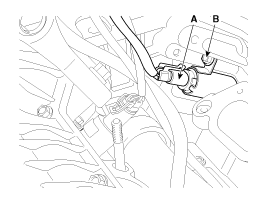
Disconnect the CVVT oil control valve connector (A). |
| 4. |
Remove the installation bolt (B), and then remove the valve from the engine.
[Bank 1]
[Bank 2]
|

| [CVVT Oil Control Valve (Exhaust)] |
| 1. |
Turn the ignition switch OFF and disconnect the battery negative (-) cable. |
| 2. |
Disconnect the CVVT oil control valve connector (A).
[Bank 1]
[Bank 2]
|


| 3. |
Remove the cylinder head cover.
(Refer to Engine Mechanical System - “Cylinder Head Assembly”) |
| 4. |
Remove the installation bolt (A), and then remove the valve from the engine.
[Bank 1]
[Bank 2]
|


| Installation |
|

|
|
| Items | Component Side | Harness Side |
| Bank 1 (RH) | Grey | |
| Bank 2 (LH) | Black | |
| 1. |
To install, reverse the removal procedure.
|
 CVVT Oil Control Valve (OCV) Schematic Diagrams
Circuit Diagram
...
 Variable Intake Solenoid (VIS) Valve Description and Operation
Description
Variable Intake manifold Solenoid (VIS) valves are installed
on the intake manifold (VIS Valve 1) and the surge tank (VIS Valve 2).
These VIS valve 1 and 2 control vacuum modulators ...
Other information:
Hyundai Genesis (DH) 2013-2016 Service Manual: Windshield Deicer Repair procedures
Inspection 1. Remove the cowl top cover. (Refer to Body - "Cowl Top Cover") 2. Disconnect the windshield deicer connector (A) from the wiper motor linkage. 3. Check for continuity between the terminals of deicer lines. 4. Turn the ignition switch ON and the windshield deicer switch ...
Hyundai Genesis (DH) 2013-2016 Service Manual: Seal Ring Radial Repair procedures
Removal Use caution when handling the transfer case. Preventing the ITA (Integrated Transfer case Actuator) from damage 1) In case of transporting the transfer case • Use caution when lifting the transfer case from the transporting package to make sure the ITA doe ...
© 2013-2025 www.hgenesisdh.com
